In the last blog I talked about using Arduino-compatible devices for sensors and various end point nodes. That may have raised a few questions. I will try to answer the first one in this post and move on to the second and third in subsequent posts.
- What’s an Arduino? I’ve never been good at ordering Italian drinks.
- Why on earth would you use an Arduino instead of a ________ fill in your preferred solution.
- What do you mean by Arduino-compatible? How is that different than an Arduino
If you’ve never heard of an Arduino and you think it sounds like some kind of Italian drink or snack, you are not far off track! You see, there were a few individuals at the the Interaction Design Institute Ivrea, in Ivrea Italy, who were looking for an inexpensive computing platform that students could afford and could use to rapidly develop interactive electronics projects. Unsatisfied with what was on the market at the time, they developed their own. In those early development days, as the story goes, the team would meet at the Arduino pastry shop near the campus. The pastry shop’s name, or possibly a shared namesake with the pastry shop, Arduin of Ivrea (former King of Italy), became the name given to the original project and the resulting hardware and software.

The bottom line of that little history tangent is that they were quite successful in creating an inexpensive, open, computing platform that is great for rapidly developing
So what is an Arduino? Before I answer that, I’m going to back up just a little bit and answer another question that will lead us very nicely to the Arduino. That question is:
What is a microcontroller?
At this point most of us are quite familiar with personal computers and would recognize at least the names if not the functions of the various building blocks that go into making one. You have likely heard of a Central Processing Unit (CPU for short) or, as it’s often called, the microprocessor or processor. This is the block that actually does the computing. By that, I mean it reads instructions from memory and carries out those instructions, much like reading and following a recipe. Speaking of memory, that’s another block we are familiar with. Maybe you have upgraded to more memory or purchased a new computer that has more memory. Then of course there is another kind of memory that we call non-volatile, which simply means that retains data even when the power is removed. This includes hard drives, thumb drives, SD cards and the like. Lastly we can’t forget about all of the peripherals like keyboards, mice, monitors, cameras, microphones, speakers etc. that allow the computer to interact with the outside world.
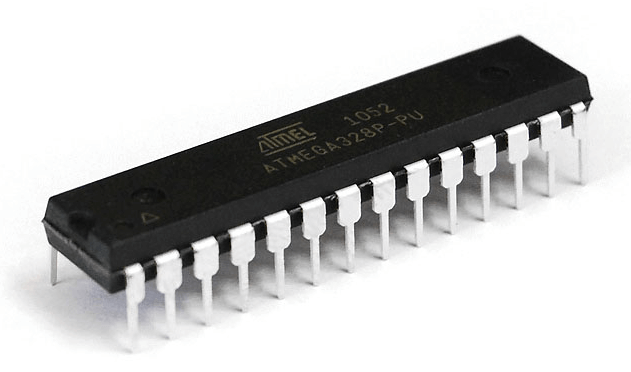
I’m pretty sure all of these basic building blocks, at least in concept, are familiar to the average maker, tinkerer, inventor type who might be following along here. That makes describing a microcontroller pretty straight forward. A microcontroller contains all of those same building blocks; CPU, memory, non-volatile memory, and peripherals and all on one chip! At the heart of the Arduino Uno, the board I’m using in this example, that microcontroller is the ATmega328P made by Atmel (Now part of Microchip Technology)
All the basic ingredients of a computer are right there in a microcontroller. These little guys power up, run programs, and interact with the outside world much like the computer on your desk. Oh, and did I mention that these little fellows are everywhere; appliances, watches, phones, your keyboard, your mouse, thermostat, iron, washer, dryer, and your car oh my! There are probably 30 – 50 of them in your average modern car just happily running their program. Years ago, I had a contract programming 10’s of thousands of microcontrollers whose lot in life was to monitor the intermittent wiper setting in a windshield wiper stock and signal the wiper motor and washer fluid pump. Sounds crazy but one set of power and communications wires is way cheaper and easier than a separate wire for every setting and washer button.
If you think it’s good to know a little about your surroundings, consider this. The year is 2020 and there are now 7.8 billion humans on the planet… Last year, in 2019 alone, 30 billion microcontrollers were shipped and they have been being manufactured since the mid 70’s
according to World Population and industry statistics
So if microcontrollers have been around since the 70’s and folks have been making products with them for all these years, and there are billions of them happily computing away all around us, what did the folks on the Arduino team do in 2005 that was so special?
In short the Arduino team, leveraging and bringing together a lot of prior work by many others, made working with microcontrollers super easy.
Let’s start our dissecting by simply looking at the the physical connections to the microcontroller. The ATMEGA 328P microcontroller, in the Dual Inline Package or DIP package, pictured above, could be plugged into a prototyping board easily enough. However, a few external components, namely a reset circuit, clock circuit and handy LED to blink on and off for debugging would always be included. Also, it’s a bit awkward to incorporate a whole prototyping board into a project. Okay, step one, we see that they put the microcontroller on a circuit board along with the always present reset circuit, clock circuit and handy LED. In addition they have a place to easily connect to the remaining pins of the microcontroller for experimenting.

At this point I should define a few things for those completely new to all of this microcontroller stuff. You may have heard the term clock speed or your computer geek friend may have said, “my new computer is running at 3.8 gigahertz”. Well, remember that our CPU is reading instructions from the memory and carrying them out just like following a recipe. It does this in a very orderly manner reading a new instruction every clock cycle, or every few clock cycles for those of you who know this stuff at a bit deeper level but I don’t want to get too far down in the weeds. That’s what the clock is for and on our Arduino Uno it ticks along reading instructions at 16 million times a second. Puny by modern desktop computer standards but nearly 8 times faster than the Apollo Guidance computer that steered astronauts to the moon and back.
And the RESET, it’s pretty self explanatory. When reading a recipe you don’t just throw a dart at it and start from where it lands, or maybe you do… I don’t want to critique your cooking style. Basically, we want to have a way of telling the CPU to go to a particular starting place and begin reading the instructions from there when we power up the circuit or press the reset button.
The LED (Light Emitting Diode), unlike the reset and clock, is not necessary for operation but it’s very nice to have. As I mentioned in the beginning, our microcontroller has peripherals but they are far more simple than the peripherals on our desktops. Our microcontroller’s peripherals are connected to the external pins, and when I say pins I’m referring to those little metal legs sticking out of the side of our microprocessor making it look like a centipede, and these peripherals do simple things. For example, set the voltage at the pin to a high level, about 5 volts on our Arduino Uno, Set the voltage to a low level, 0 volts on our Arduino, Read the voltage level present on a pin and so on. More on microcontroller peripherals later.
Alright, we’ve stuck the microcontroller on a circuit board with a few components that we always need. That’s gonna save us a good 10 minutes of poking things in a prototyping board. “Big deal”, you say but wait there’s so much more!
Remember those instructions we keep talking about that the microcontroller diligently follows. Let’s take a look at a few of them in the data sheet for the ATmega328P.

You can see from these first few lines that the instructions the microcontroller is following, or as we computer geeks say executing, are very simple. things like adding and subtracting two numbers, which happen to be stored in memory locations called registers. I don’t want to loose any of you who slept through biology but the microcontroller instruction set is a bit like our DNA or Genes. There are only a few instructions but they can be combined in immensely complicated strings of instructions to carry out super complex tasks.
Don’t panic! That’s all I’m going to say about these low level instructions, or “code”, that the microcontroller is executing.
Dinosaurs like me, at least on the microcontroller timeline, used to code in these instructions but those days are behind us. Generations of computer scientists have created “high level” programming languages that read more like English and specialized programs, called compilers, that automate the process of converting that high level language into these simple instructions.
The Arduino team was able to stand on the shoulders of giants and make use of these tools but they did something clever that made life even easier for their students. You see, when you are working with microcontrollers there are a number of compilers to choose from, the compiler has to be configured for the microcontroller that you are using, there are parameters that have to be set just so, and then if all of that goes according to plan with the compiler you still have to find a way to get the resulting code (those simple instructions) stored in the memory of the microcontroller. Trust me it can be a path filled with rabbit holes and dead ends. To avoid this holdup, the Arduino team created a software application we call an Integrated Development Environment or IDE for short. Not only does this software have a text editor allowing you to write and edit your high level code, but within this application you can simply choose which variation of Arduino you are working with (different Arduino board variations use different microcontrollers) and it sets up everything behind the scenes to get your high level code compiled correctly (turned into those simple instructions) and to top it off it sends it over to the memory in the microcontroller. The IDE serves as your dashboard to do everything you need to write a program and store that program in the microcontroller and off that little beast goes running your very own program!!
I’ve gotten a little ahead of myself with that last bit. To be fair, that is just how it works when you buy your Arduino board, connect up a cable, fire up the IDE, compile a program and upload it to the Arduino. However, that’s taking for granted another wonderful bit of clever handiwork by the Arduino team.
An Atmel ATmega328p microcontroller straight from the factory would just blankly stare back at your fancy Arduino IDE with absolutely no clue what to do. Take a moment to look back at the last picture with the ATmega328 instructions. Now, look up at the top right corner of the picture and note the number of the page just before the instruction list. Yep, that’s right page 624. The data “sheet” for the ATmega328p is 662 pages long. This microcontroller is no different than most modern microcontrollers. It is a very capable part with a multitude of configurations, peripheral options, clock speeds, memory configurations… the list goes on and on.
If you are developing an application from scratch old school style, you would pour over the data sheet finding what the default for each of those options are set to from the factory, determining if you need to change it and what to change it to and then once you have noted all of these bits and bytes you would use a specialized programming tool to connect up to the microcontroller and store all of these configuration bits along with your program into the memory of the microcontroller. Keep in mind that from the factory there is no program at all in the microcontroller. It is a blank slate.
Once again, the Arduino team saved their students, and lots of tinkers to follow, bleary eyed data sheet drudgery that was once involved in getting even the simplest of applications off the ground.
They figured out a typical and quite usable configuration for all of the options and wrote a short program which was then pre-loaded into the microcontroller. When the microcontroller is reset it begins executing this program which does two wonderful things for you.
First, when it was programmed in using that more specialized programming tool all of those fiddly configuration bits were set to reasonable typical values the you might typically use and that match the hardware on the circuit board such as that 16Mhz clock.
Second, it has configured a serial port, (yes the little microcontroller has a serial port like your old school computer) and right after it’s powered up, or reset, it checks the serial port to see if you are sending data from the Arduino IDE to upload a program over the serial port. No special programming hardware required! The ATmega328P can read data from the serial port, your new program in this case, and store it in non-volatile memory so that the next time it powers up, it’s running your program. By the way, this little pre-stored program is called a bootloader which comes from the old saying of, “pulling oneself up by the boot straps”. If it starts up and doesn’t detect that you are trying to send a new program it simply starts running the last one you sent.
We’re almost there thanks for hanging in. Above, I stated that the Atmega328P microcontroller has a serial port like your old school computer. It’s technically a little different electrically but the fact remains that it is incompatible with your newfangled USB port on the computer where you are running the Arduino IDE, and hopefully appreciating all the heavy lifting it’s doing for you!

To solve this problem we have to circle back around to the hardware. If we take a look again at our Arduino Uno board we will see that there is another chip or Integrated Circuit (IC), crystal oscillator and a few other resistors and capacitors. These components convert signals to and from the USB connection and the logic level serial port on the microcontroller.
Just one more thing. The Arduino as clever as it may be, doesn’t run on magic. It requires a power supply. It’s very convenient that the USB port on your computer, running the IDE and connected to the Arduino, or even a USB wall charger and cable connected to the Arduino’s USB port will supply it with power. In addition there is a separate power connector that you can use with a 7V to 12V DC supply for powering the board. Applying 7V to 12V to this connector will disconnect the power coming from the USB cable but you will still be able to send data over the USB to program and monitor the Arduino board.
That’s all for now,
— Tanda
Pingback: URL
Pingback: social signals service